Environment Variables and Secrets
You can (and should!) use environment variables to configure your Render services:

Environment variables enable you to customize a service’s runtime behavior for different environments (such as development, staging, and production). They also protect you from committing secret credentials (such as API keys or database connection strings) to your application source.
In addition to setting environment variables, you can:
- Upload plaintext secret files to Render that are available from your service’s file system at runtime.
- Create environment groups to share a collection of environment variables and secret files across multiple Render services.
Setting environment variables
Render sets default values for certain environment variables. See the list.
In the Render Dashboard
-
In the Render Dashboard, select the service you want to add an environment variable to.
-
Click Environment in the left pane.
-
Under Environment Variables, click + Add Environment Variable.
- You can also click Add from .env to add environment variables in bulk.
-
Provide a Key and Value for each new environment variable.
-
Save your changes. You can select one of three options from the dropdown:
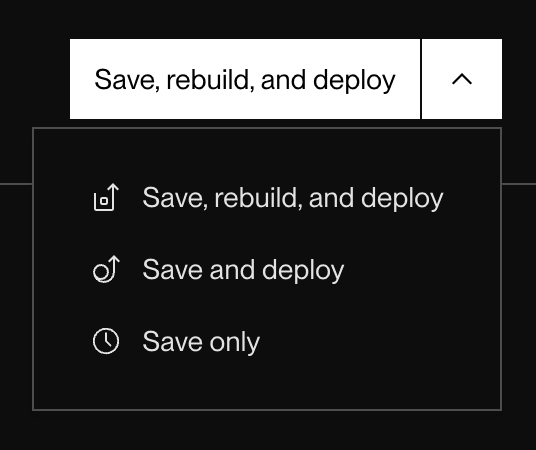
- Save, rebuild, and deploy: Render triggers a new build for your service and deploys it with the new environment variables.
- Save and deploy: Render redeploys your service’s existing build with the new environment variables.
- Save only: Render saves the new environment variables without triggering a deploy. Your service will not use the new variables until its next deploy.

That’s it! Render saves your environment variables and then kicks off a deploy (unless you selected Save only).
Adding in bulk from a .env file
If you have a local .env file, you can bulk-add its environment variables to your service by clicking Add from .env on your service’s Environment page.
Your file must use valid .env syntax. Here are some valid variable declarations:
# Value without quotes (doesn't support whitespace)
KEY_1=value_of_KEY_1

# Value with quotes (supports whitespace)
KEY_2="value of KEY_2"

# Multi-line value
KEY_3="-----BEGIN-----
value
of
KEY_3
-----END-----"
Via Blueprints
If you’re using Render Blueprints to represent your infrastructure as code, you can declare environment variables for a service directly in your render.yaml file.
Don’t commit the values of secret credentials to your render.yaml file! Instead, you can declare placeholder environment variables for secret values that you then populate from the Render Dashboard.
Here are common patterns for declaring environment variables in a Blueprint:
envVars:
  - key: NODE_ENV
    value: staging # Set NODE_ENV to the hardcoded string 'staging'

  - key: APP_SECRET
    generateValue: true # Render generates a random base64-encoded, 256-bit secret for APP_SECRET

  - key: DB_URL
    fromDatabase: # Set DB_URL to the connection string for the db 'mydb'
      name: mydb
      property: connectionString

  - key: MINIO_ROOT_PASSWORD
    fromService: # Copy the MINIO_ROOT_PASSWORD from the private service 'minio'
      type: pserv
      name: minio
      envVarKey: MINIO_ROOT_PASSWORD

  - key: STRIPE_API_KEY
    sync: false # For security, provide STRIPE_API_KEY in the Render Dashboard

  - fromGroup: my-env-group # Link the 'my-env-group' environment group to this service
For more details and examples, see the Blueprint Specification.
Secret files
You can upload secret files to Render to make those files available to your service at runtime. These are plaintext files that usually contain one or more secret credentials, such as a private key.
-
In the Render Dashboard, select the service you want to add a secret file to.
-
Click Environment in the left pane.
-
Under Secret Files, click + Add Secret File.
- You can click the button multiple times to add multiple files.
-
Provide a Filename for the secret file.
- At runtime, your secret file will have this name.
- The file will be available from your service’s root directory, and also from
/etc/secrets/<filename>.
-
Click the Contents field to paste in the file’s contents.
-
Click Save Changes.
That’s it! Render kicks off a new deploy of your service to make the secret file available.
Environment groups
Environment groups are collections of environment variables and/or secret files that you can link to any number of different services. They’re a helpful way to distribute configuration across a multi-service architecture using a single source of truth:
Creating an environment group
-
In the Render Dashboard, click Environment Groups in the left pane.
-
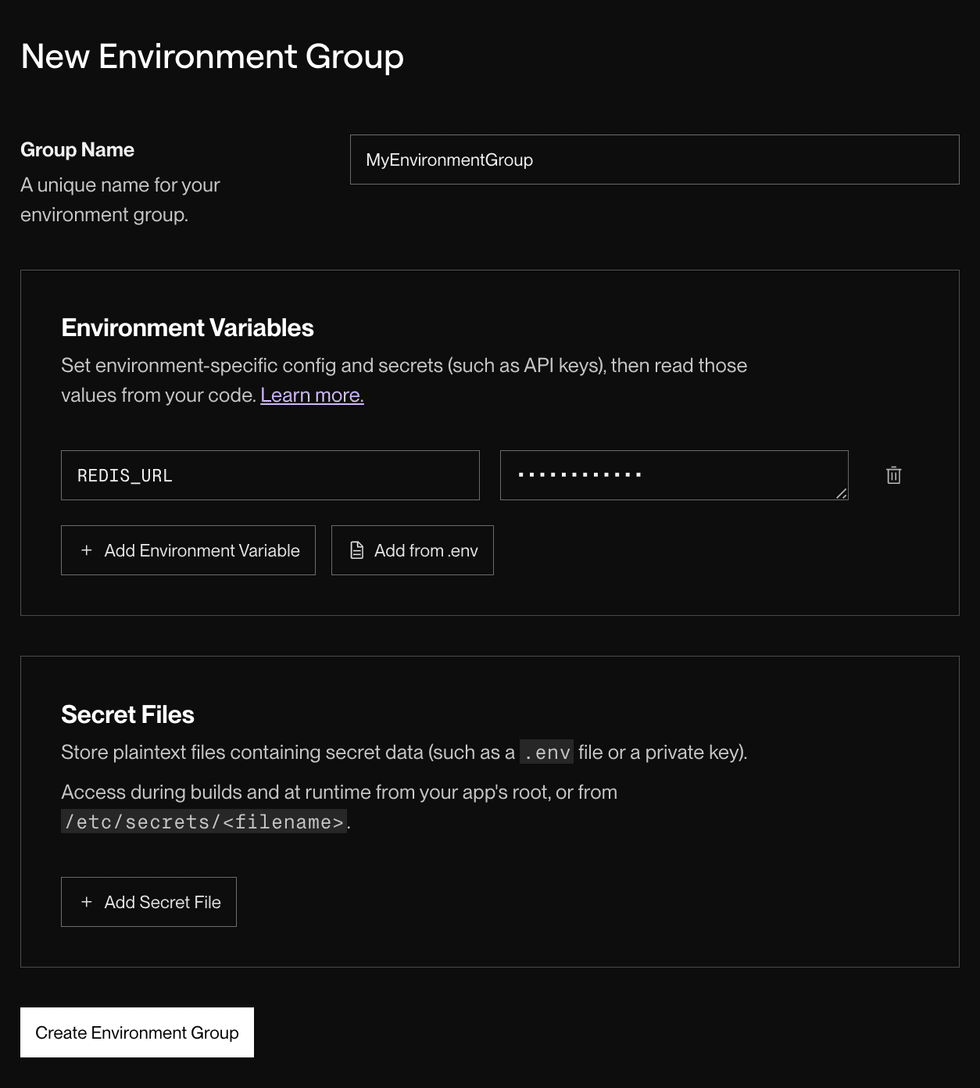
Click + New Environment Group. The following form appears:
-
Provide a helpful Group Name.
-
Provide the keys and values for any environment variables you want to add to the group.
-
Upload any secret files you want to add to the group.
-
Click Create Environment Group. The newly created group appears in the list on your Env Groups page.

Linking a group to a service
After you create an environment group, you can link it to any number of different services. You can link multiple environment groups to a single service.
Important precedence details:
- Avoid variable collisions when linking multiple environment groups. Render does not guarantee its precedence behavior when multiple linked environment groups define the same environment variable.
- Currently, Render uses the value from the most recently created environment group. This behavior might change in the future without notice.
- If a service defines an environment variable in its individual settings, that value always takes precedence over any linked environment groups that also define the variable. Render does guarantee this behavior.
-
In the Render Dashboard, select the service you want to link an environment group to.
-
Click Environment in the left pane.
-
Under Linked Environment Groups, select a group from the dropdown and click Link.
That’s it! Render kicks off a new deploy of your service to incorporate the values from the linked environment group.
Modifying a group
You can modify an existing environment group from your Env Groups page in the Render Dashboard. You can add new values, replace existing values, and so on.
If you make changes to an environment group (including deleting it), Render kicks off a new deploy for every linked service that has autodeploys enabled.
Scoping a group to a single environment
You can create projects to organize your services by their application and environment (such as staging or production). You can then scope an environment group to only the services in a single project environment. If you do, you can’t link the group to any service outside that environment. This helps ensure that your services use exactly the configuration you expect.
If an environment group doesn’t belong to a particular project environment, you can link it to any service in your team—including services that do belong to an environment.
-
From your environment group’s details page, click Manage > Move group:
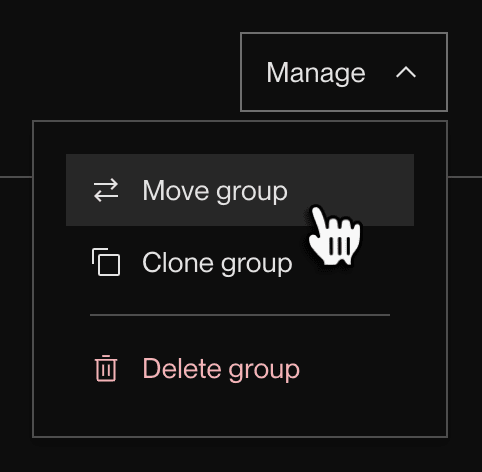
(This option doesn’t appear if you haven’t created any projects.)
-
In the dialog that appears, select a project and environment to move to.
-
Click Move env group.

After you move a group to a particular environment, it appears on the associated project’s page:

Note that you still need to link the group to any applicable services in the environment.
Reading environment variables from code
Each programming language provides its own mechanism for reading the value of an environment variable. Below are basic examples of reading the environment variable DATABASE_URL.
Environment variable values are always strings.
In your application logic, perform any necessary conversions for variable values that represent other data types, such as "false" or "10000".
JavaScript
const databaseUrl = process.env.DATABASE_URL;Python
import os
database_url = os.environ.get('DATABASE_URL')
Ruby
database_url = ENV['DATABASE_URL']Go
package main
import "os"

func main() {
	databaseURL := os.Getenv("DATABASE_URL")
}
Elixir
database_url = System.get_env("DATABASE_URL")Setting environment variables locally
Using export
To set environment variables in your local environment, you can use the export command in your terminal:
export KEY=valueUsing a .env file
It can be useful to create a local .env file at the root of your local project that lists the names and values of environment variables, like so:
KEY1=value1
KEY2=value2
Many languages have a library for reading a .env file, such as dotenv for Node.js and python-dotenv for Python.
If you use a .env file, you can bulk-add its environment variables to your Render service.
Do not commit your .env file to source control! This file often contains secret credentials. To avoid accidentally committing it, add .env to your project’s .gitignore file.